Mob の回転速度を変更する(MinecraftForge Modding 1.16.5)
Mob の回転速度変更が若干ややこしかったので紹介します。
結論
MobEntity クラスの以下の二つのメソッドをオーバーライドします。
    /**
     * Face rotation speed.
     * F3+B で当たり判定表示したときの視線の回転速度。モデルの回転速度ではない!!
     * LookController#setLookPosition() で参照されている。
     * @return int speed.
     */
    @Override
    public int getFaceRotSpeed() {
        return 10;
    }

    /**
     * Model rotation speed.
     * Entity のモデルの回転速度。視線が回転したあと遅れてモデルが回転する、その時の速度。
     * BodyController#func_220663_b() で参照されている。
     * @return int speed.
     */
    @Override
    public int getHorizontalFaceSpeed() {
        return 75;
    }
メソッド名と内容が一致してないのでややこしいですね。
ペットを追加する(MinecraftForge Modding 1.16.5)
MinecraftForge 1.16.5 でのペットの追加方法を解説します。
ペットを追加するには、TamableEntity を継承した Entity を作成します。
通常であれば、TamableEntity を継承しただけで良さそうですが、猫や狼などのペットのソースコードを眺めてみると、共通の機能(手懐ける、座らせる、首輪の色を変えるなど)が TamableEntity には実装されておらず、猫や狼のクラスで毎回べた書きする仕様になっていることが分かります。
よって、自作 Mod でペットを追加する場合は、それらの機能も自分で書く必要があります。
以下、解説付きソースコードです。
(※Renderer, Model 等は含みません。基本的な Mob の追加方法はこちらの記事をご参照ください。)
TestEntity.java
/**
 * Test pet entity.
 */
public class TestEntity extends TameableEntity {
    /**
     * 繁殖用アイテム、首輪の色用の DataParameter を初期化しておきます。
     * 首輪の色の DataSerializers.VARINT は整数を意味します。
     */
    private static final Ingredient BREEDING_ITEM = Ingredient.fromItems(Items.PUMPKIN_SEEDS);
    private static final DataParameter<Integer> COLLAR_COLOR = EntityDataManager.createKey(TestEntity.class, DataSerializers.VARINT);
    protected TestEntity(EntityType<? extends TestEntity> type, World worldIn) {
        super(type, worldIn);
    }

    /**
     * データの登録。
     * ここで首輪の色を赤色で初期化します。
     */
    @Override
    protected void registerData() {
        super.registerData();
        this.dataManager.register(COLLAR_COLOR, DyeColor.RED.getId());
    }

    /**
     * AI の設定。
     * addGoal(優先度, 行動の種類) です。優先度の数値が若いほど優先度が高くなります。
     * Goal クラスを継承して自作の行動を実装することもできます。
     */
    @Override
    protected void registerGoals() {
        this.goalSelector.addGoal(0, new SwimGoal(this));
        this.goalSelector.addGoal(1, new PanicGoal(this, 2.0D));
        this.goalSelector.addGoal(2, new SitGoal(this));
        this.goalSelector.addGoal(3, new BreedGoal(this, 1.0D));
        this.goalSelector.addGoal(5, new TemptGoal(this, 1.25D, BREEDING_ITEM, false));
        this.goalSelector.addGoal(6, new FollowOwnerGoal(this, 1.0D, 10.0F, 5.0F, false));
        this.goalSelector.addGoal(7, new FollowParentGoal(this, 1.25D));
        this.goalSelector.addGoal(8, new WaterAvoidingRandomWalkingGoal(this, 1.5D));
        this.goalSelector.addGoal(9, new LookAtGoal(this, PlayerEntity.class, 6.0F));
        this.goalSelector.addGoal(10, new LookRandomlyGoal(this));
    }

    /**
     * Entity の属性の設定。
     * MainMod から呼び出します。
     * @return attribute.
     */
    public static AttributeModifierMap.MutableAttribute setCustomAttributes() {
        return MobEntity.func_233666_p_()
                .createMutableAttribute(Attributes.MAX_HEALTH, 10.0D)
                .createMutableAttribute(Attributes.MOVEMENT_SPEED, 0.25F);
    }

    /**
     * CreateChild() 的なメソッド。
     * 最初の行で子供の Entity を作成し、飼い主と首輪の色を親から引き継ぎます。
     * (なぜか猫は首輪の色引き継ぐのに、狼は引き継がないんですよね。。。)
     * @param world server world.
     * @param partner entity.
     * @return child entity.
     */
    @Override
    public AgeableEntity func_241840_a(ServerWorld world, AgeableEntity partner) {
        TestEntity child_entity = MainMod.TEST_ENTITY.create(world);
        if (this.isTamed()) {
            assert child_entity != null;
            child_entity.setOwnerId(this.getOwnerId());
            child_entity.setTamed(true);

            if (this.rand.nextBoolean()) {
                child_entity.setCollarColor(this.getCollarColor());
            } else {
                child_entity.setCollarColor(((TestEntity)partner).getCollarColor());
            }
        }
        return child_entity;
    }

    /**
     * 繁殖用アイテムの設定。
     * デフォルトでは小麦が設定されているので、上書きする必要があります。
     * @param stack item stack.
     * @return breeding item.
     */
    @Override
    public boolean isBreedingItem(ItemStack stack) {
        return BREEDING_ITEM.test(stack);
    }

    /**
     * 首輪の色のゲッター。
     * COLLAR_COLOR に格納されている ID から DyeColor を取り出します。
     * @return dye color id.
     */
    private DyeColor getCollarColor() {
        return DyeColor.byId(this.dataManager.get(COLLAR_COLOR));
    }

    /**
     * 首輪の色のセッター。
     * DyeColor を ID に変換してからセットします。
     * @param color dye color id.
     */
    private void setCollarColor(DyeColor color) {
        this.dataManager.set(COLLAR_COLOR, color.getId());
    }

    /**
     * PlayerInteract() 的なメソッド。
     * アイテムを持って右クリックした際の挙動を設定します。(手懐け、回復、首輪の色の変更、座らせる等)。
     * ここでの条件に当てはまらなかった場合は、親クラス(AnimalEntity)のデフォルトの挙動を呼び出します。 (繁殖、子供の成長)。
     * ActionResultType.func_233537_a_(this.world.isRemote); は、「成功」を表しています。
     * @param player player entity.
     * @param hand player hand.
     * @return action result type.
     */
    @Override
    public ActionResultType func_230254_b_(PlayerEntity player, Hand hand) {
        ItemStack itemStack = player.getHeldItem(hand);
        Item item = itemStack.getItem();
        boolean tamable = this.isBreedingItem(itemStack) && !this.isTamed();
        boolean healable = this.isBreedingItem(itemStack) && this.getHealth() < this.getMaxHealth();
        boolean dyeable = this.isOwner(player) && item instanceof DyeItem;
        boolean sittable = this.isOwner(player);

        if (tamable) {
            // taming
            this.consumeItemFromStack(player, itemStack);
            if (!this.world.isRemote) {
                if (this.rand.nextInt(3) == 0 && !net.minecraftforge.event.ForgeEventFactory.onAnimalTame(this, player)) {
                    this.setTamedBy(player);
                    this.world.setEntityState(this, (byte) 7);
                } else {
                    this.world.setEntityState(this, (byte) 6);
                }
            }
            return ActionResultType.func_233537_a_(this.world.isRemote);

        } else if (healable) {
            // healing
            this.consumeItemFromStack(player, itemStack);
            this.heal(5);
            System.out.println("Healing");
            return ActionResultType.func_233537_a_(this.world.isRemote);

        } else if (dyeable) {
            // dyeing
            if (!this.world.isRemote) {
                DyeColor dyecolor = ((DyeItem) item).getDyeColor();
                if (dyecolor != this.getCollarColor()) {
                    this.consumeItemFromStack(player, itemStack);
                    this.setCollarColor(dyecolor);
                    System.out.println("Dyeing collar:" + dyecolor);
                }
            }
            return ActionResultType.func_233537_a_(this.world.isRemote);

        } else if (sittable) {
            // sitting
            if (!this.world.isRemote) {
                ActionResultType defaultBreedingResult = super.func_230254_b_(player, hand);
                if (!defaultBreedingResult.isSuccessOrConsume() || this.isChild()) {
                    // プレイヤーが子供に繁殖用アイテムを使った場合は、成長と座らせるのを両方実行します(猫・狼と同じ)。
                    this.func_233687_w_(!this.isSitting());
                    System.out.println("Sitting:"+this.isSitting());
                }
            }
            return ActionResultType.func_233537_a_(this.world.isRemote);

        } else {
            // default breeding
            return super.func_230254_b_(player, hand);
        }
    }
}
MainMod.java
@Mod(MainMod.MOD_ID)
public class MainMod {
    public static MainMod instance;
    public static final String MOD_ID = "mainmod";
    /**
     * Test entity instance.
     */
    public static final EntityType<TestEntity> TEST_ENTITY =
            EntityType.Builder.create(TestEntity::new, EntityClassification.CREATURE)
            .size(0.5f, 0.75f)
            .setShouldReceiveVelocityUpdates(false)
            .build("test_entity");

    public MainMod() {
        instance = this;
        FMLJavaModLoadingContext.get().getModEventBus().addListener(this::createEntityAttributes);
        MinecraftForge.EVENT_BUS.register(this);
    }

    /**
     * Create custom entity attributes.
     * Setup TestEntity attribute.
     * @param event entity attribute creation event.
     */
    private void createEntityAttributes(final EntityAttributeCreationEvent event) {
        event.put(TEST_ENTITY, TestEntity.setCustomAttributes().create());
    }

    /**
     * Entity registry event.
     * @param event registry event,
     */
    @SubscribeEvent
    public static void onEntityRegistered(final RegistryEvent.Register<EntityType<?>> event) {
        TEST_ENTITY.setRegistryName(MainMod.MOD_ID, "test_entity");
        event.getRegistry().registerAll(TEST_ENTITY);
    }
}
長いですね。。
TamableEntity にまとめておいてくれたら楽なのに。
猫・狼・オウムで全部書き方も違うので困っちゃいますね。
Custom Entity Attributeを追加する(MinecraftForge Modding 1.16.5)
Minecraft Forge 1.16.5でMobを追加するにあたって、1.15以前とMobのAttributeの追加方法が変わっていたので、紹介します。
基本的なMobの追加方法は、こちらの記事が分かりやすいのでおすすめです。
TestEntity.java
public class TestEntity extends AnimalEntity {
    protected TestEntity(EntityType<? extends AnimalEntity> type, World worldIn) {
        super(type, worldIn);
    }
    public static AttributeModifierMap.MutableAttribute setCustomAttributes() {
        return MobEntity.func_233666_p_()
                .createMutableAttribute(Attributes.MAX_HEALTH, 10.0D)
                .createMutableAttribute(Attributes.MOVEMENT_SPEED, 0.25F);
    }
MainMod.java
@Mod("mainmod")
public class MainMod {
    public MainMod() {
        FMLJavaModLoadingContext.get().getModEventBus().addListener(this::setupCustomEntities);
        MinecraftForge.EVENT_BUS.register(this);
    }
    private void setupCustomEntities(final EntityAttributeCreationEvent event) {
        event.put(ModEntities.TEST_ENTITY, TestEntity.setCustomAttributes().create());
    }
}
各EntityクラスにAttribute登録用関数を用意しておいて、MainからEntityAttributeCreationEventを介して登録するようになったみたい。
参考
1.16.1 Custom Entity attributes - Modder Support - Forge Forums
How to register entity attributes? [1.16.2] - Modder Support - Forge Forums
【Minecraft】既存ワールドの任意の地点を新しいシード値で再生成する

この記事は,
「マイクラで新しいアプデが来たからいつも使ってるワールドで遊びたいけど,
マップ広げすぎて遠いところまでいかないといけなくてめんどくさい!!」
というお悩みを解決するためのものです.
一般的には,
「WorldEditを使ってこれまでのワールドの建造物を新しいワールドに持ってくる」
という方法が取られますが,この記事では,
「これまでのワールドの一部を新しいシード値で上書きする」
という別の方法をご紹介します.
ちなみに,任意の地点と言っていますが,細かい指定はできません.
※作業前に念のためバックアップを取ってください!
目次
この記事の特徴
- MOD不要!
- 最新版対応(ver 1.16.5)
- 建造物・チェストの中身・村人・Mob も移行可能
- ワールドデータを引き継げる(インベントリ・経過日数・エンドラ討伐数等)
概要
大まかな方針としては,内部ファイルの一部を新しいワールドのものに置き換えます.
内部ファイルは,Windows の場合,基本的には以下のパスに入っています.
C:\Users\[ユーザ名]\AppData\Roaming\.minecraft\saves\[ワールド名]
変更する内部ファイルは,上記パス内の以下の4つです.
- level.dat (シード値等の設定ファイル)
- region (オーバーワールドのマップデータ)
- DIM1/region (エンドのマップデータ)
- DIM-1/region (ネザーのマップデータ)
必要な手順は,
だけでOKです.
次にプレイしたときに,削除したエリアが新しいシード値で再生成されます.
level.dat と region フォルダについて詳しく知りたい方は,以下のリンク先をご参照ください. minecraft-ja.gamepedia.com
方法
1. 再生成したいエリアの region ファイルを削除
region フォルダを開くと,「r.0.0.mca」「r.-10.18.mca」などのファイルがあります.
二つの数値は(x, z)の「リージョン座標」を表しています.
これが各エリアのデータです.
xとzはリージョンの座標(≠map座標,≠チャンク座標)を表します。各チャンクはチャンク座標を32で除算した値(端数切捨て)のリージョン座標に属します。 twilight1730.blog.fc2.com
要するに,若い数値のエリアがスポーン地点周辺になります.
リージョン座標が分かる方は,任意の .mca ファイルを直接削除すればOKです.
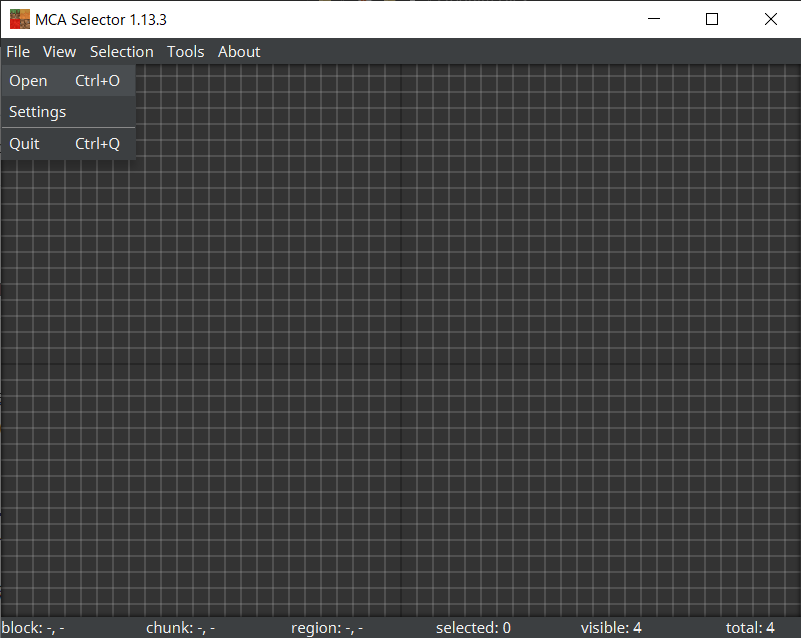
目で見て判断したい場合は,以下のツールが分かりやすいです.
実際にマップを見ながらファイルの取捨選択ができます.
リンク先ページの下から .jar ファイルをダウンロードして開きましょう.

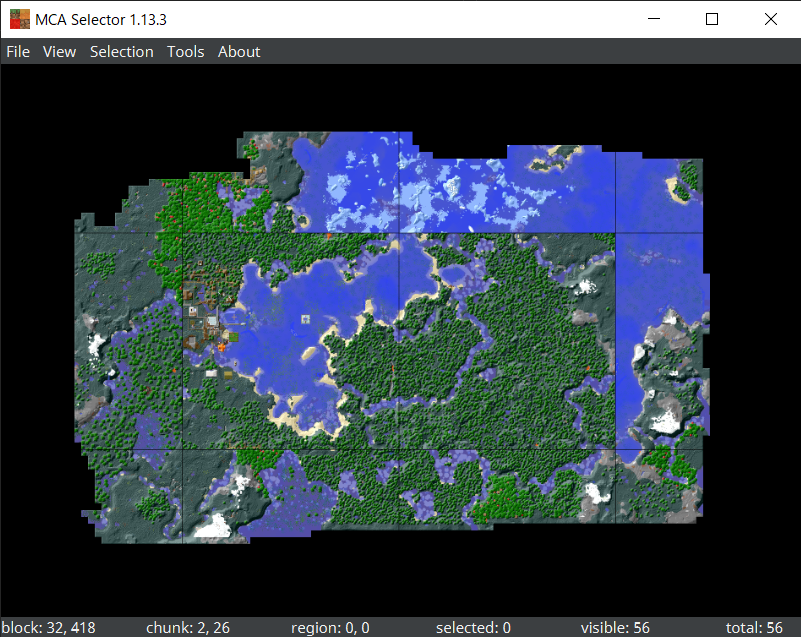
開くとこんな感じ. File > Open から region フォルダを選択してください.
以下のように,生成されたマップ領域が表示されます.
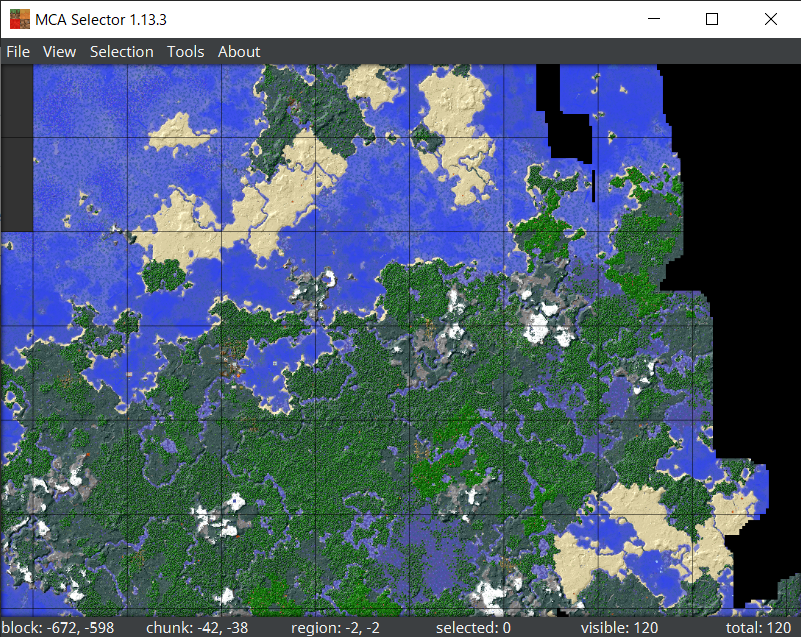
左クリックで選択,右クリックで選択解除,中ボタンで拡大縮小と移動ができます.
削除したい部分を選択して,Selection > Delete selected chunks で任意のエリアを削除できます.
または,残したい部分を選択して,Selection > Export selected chunks で任意のエリアだけ切り出せます.
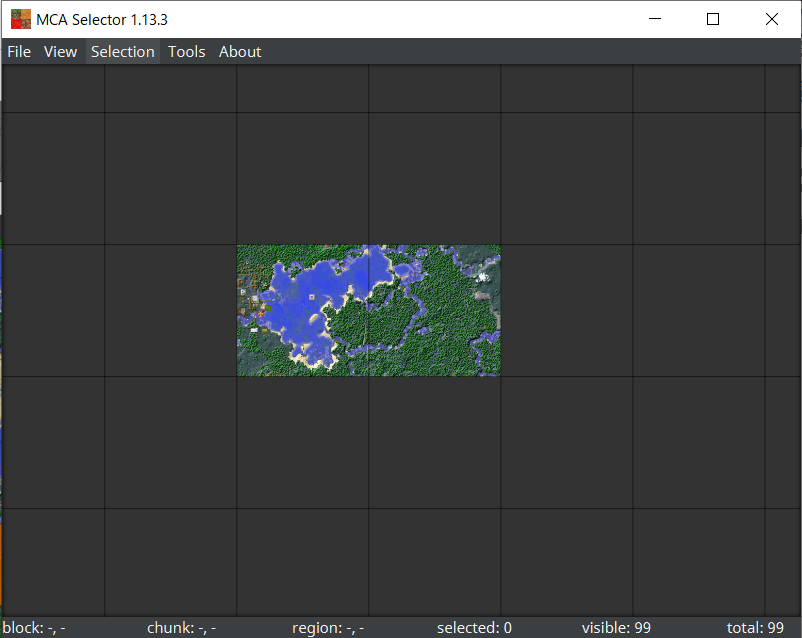
後者の場合は,一旦別フォルダに Export してから region フォルダを置き換えてください.

無事,削除できました!
2. level.dat 内のシード値を変更
まず,新しいシード値を用意しましょう.
先ほど削除したエリアがここで指定するシード値で再生成されます.
level.dat はバイナリファイルなので,一度人が読める形式に変換する必要があります.
ここでは,以下のツールを使います.
リンク先の .msi ファイルをダウンロードして起動しましょう.
File > Open から変更する level.dat を開きます.
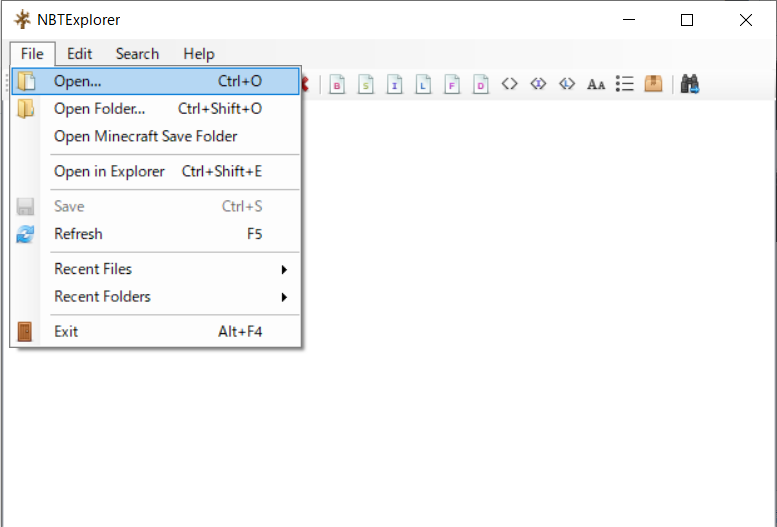
"Data > WorldGenSettings" 内の seed を全て新しいシード値に変更します.
設定箇所は,WorldGenSettings 直下と dimensions 内に複数ありますのでご注意ください.
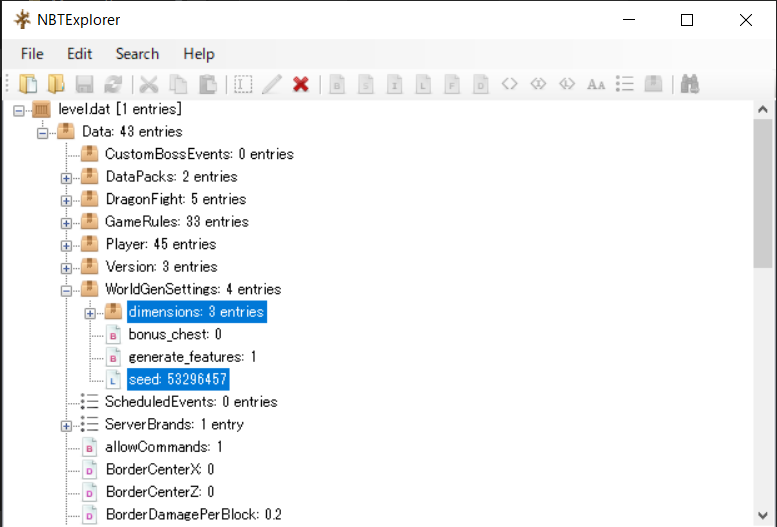
dimensions 内は,「overworld」「the_end」「the_nether」の3つに分かれています.
それぞれ2か所 seed を指定する必要があります.
下図は,overworld の例です.
"generator > seed" と "generator > biome_source > seed" を変更します.
the_end,the_nether も同様に変更してください.

以上の手順で,既存ワールドが新しいシード値で再生成できるようになりました!!
結果
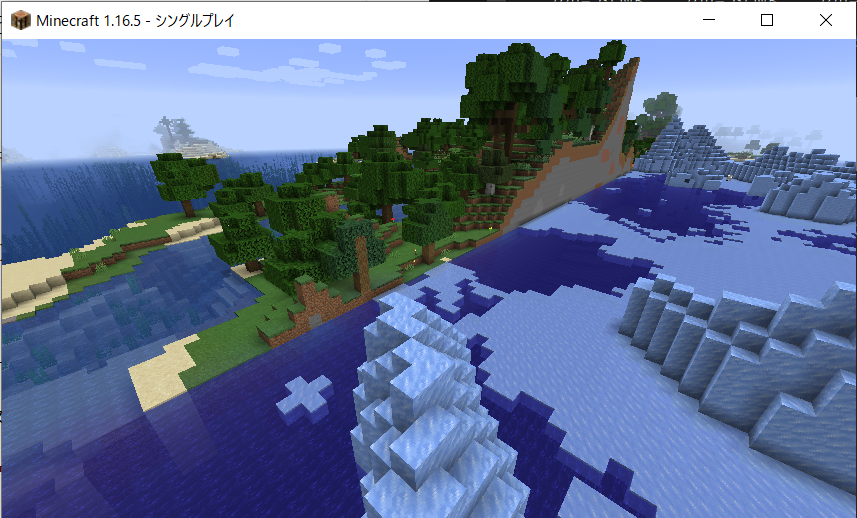
あとはMinecraftを起動して歩き回るだけです.
先ほど例で切り出したエリアの外周を歩いてみました.
シード値が変わったことで,以下のように突然バイオームが変わっていることが確認できます.
境界には所謂「バージョンの壁」が生成されます.